or Call Us at 1-800-776-2228
or Call Us at 1-800-776-2228
Here’s a fun DIY project that combines woodworking and upholstery. This corner shelf is a great addition to any living room, bedroom, or kitchen. In this tutorial, we’ll show you how to build your own Fabric Backed Corner Shelf using your Arrow PT18G Pneumatic Brad Nailer and your Arrow T50 Staple Gun.

Pneumatic Brad Nailer
Heavy-Duty Staple Gun
Before you get started: Cut all boards to the specifications in the cutting list. Because of the particular shape of this project, we recommend sticking to the old woodworking rule of “measure twice and cut once”. We also recommend painting or staining your wood before putting it together. Lastly, be sure to iron your fabric beforehand to avoid wrinkles.
Start by building the frame. Lay one of the 36-inch 1x3s parallel to the 1×1 board. Lay out four of the 10.6 inch 1×2 boards perpendicular between these, as shown below. The first board should be 3/4 of an inch from the bottom of the 1×1, the second 13-1/2 inches, the third 26-1/4 inches, and the fourth at the top (34-1/2 inches from the bottom).
All measurements are taken from the bottom of the 10.6 inch 1×2 boards (the bottom of the frame is on the right in the second picture). After placement, be sure to turn the 1×3 board on its side.
Nail the boards together with your PT18G using 1-1/4 inch brad nails. Make sure the boards are even on both sides.
Nail the boards together with your PT18G using 1-1/4 inch brad nails. Make sure the boards are even on both sides.
Repeat this process for the other side of the frame – lay out the pieces, measure their placements, and then nail the pieces together. Make sure this side of the frame lays perpendicular to the first side.
Repeat this process for the other side of the frame – lay out the pieces, measure their placements, and then nail the pieces together. Make sure this side of the frame lays perpendicular to the first side.
Begin fitting the pieces of the shelves into place on the 10.6 inch 1×2 support beams. Start with the bottom shelf. When they’re lined up, nail them to the support beams. See the Shelve Overview diagram for further instructions.
Begin fitting the pieces of the shelves into place on the 10.6 inch 1×2 support beams. Start with the bottom shelf. When they’re lined up, nail them to the support beams. See the Shelve Overview diagram for further instructions.
Cut a piece of fabric to about 40 by 48 inches. We’ll be cutting it to fit later, so the measurements don’t have to be exact. Lay the shelf on it’s side, face down. Drape the fabric over it, also face down.
Line up the bottom corner of the bottom shelf with the bottom corner of the fabric.
Cut a piece of fabric to about 40 by 48 inches. We’ll be cutting it to fit later, so the measurements don’t have to be exact. Lay the shelf on it’s side, face down. Drape the fabric over it, also face down.
Line up the bottom corner of the bottom shelf with the bottom corner of the fabric.
Staple the fabric to the frame using your Arrow T50 Staple gun using 1/4 inch staples. Staple all the way around the frame. If any fabric hangs over the edge, you can fold it over and staple it again.
Staple the fabric to the frame using your Arrow T50 Staple gun using 1/4 inch staples. Staple all the way around the frame. If any fabric hangs over the edge, you can fold it over and staple it again.
Turn the project around and staple the fabric to the other side of the frame, the same way as the first side. Staple all the way around the frame.
Turn the project around and staple the fabric to the other side of the frame, the same way as the first side. Staple all the way around the frame.
Fold the fabric over the staples to the first side of the frame, creating a second layer of fabric now facing upwards.
Staple this second layer to the frame over the first.
Once again, turn the project around to the first side, and staple the second layer of fabric over the first.
Fold the fabric over the staples to the first side of the frame, creating a second layer of fabric now facing upwards.
Staple this second layer to the frame over the first.
Once again, turn the project around to the first side, and staple the second layer of fabric over the first.
Cut off any excess fabric. It’s okay if your cuts are not perfect because they will be covered up.
Cut off any excess fabric. It’s okay if your cuts are not perfect because they will be covered up.
Begin fitting the mitered 1/4 inch boards around the back sides of the frame to cover up the edges of the fabric. Using your PT18G, nail the boards to the frame. Use 5/8 inch nails for this step.
Begin fitting the mitered 1/4 inch boards around the back sides of the frame to cover up the edges of the fabric. Using your PT18G, nail the boards to the frame. Use 5/8 inch nails for this step.
Rotate the project so you can reach the top. Take the two pieces of 1/4 inch boards that are mitered on only one side, and fit them onto the top of the project. Nail them in place.
Rotate the project so you can reach the top. Take the two pieces of 1/4 inch boards that are mitered on only one side, and fit them onto the top of the project. Nail them in place.
Stick adhesive foam pads to the bottom of the legs of the shelf, to protect your floors from scratches. You can cut the pads to fit the legs.
Stick adhesive foam pads to the bottom of the legs of the shelf, to protect your floors from scratches. You can cut the pads to fit the legs.
We’d love to see how your Fabric Backed Corner Shelf turned out! Share your project pictures on Facebook, Instagram or X by using #ArrowStrong, or by tagging Arrow Fastener.
Get Arrow tips, tricks, projects and promos in your inbox!
Hey there! We’ve updated our Privacy and Cookie Policies at the request of some of our friends in Europe. Click Accept to let us know you’re okay with the updates. Thanks!
View Cookie Policy Accept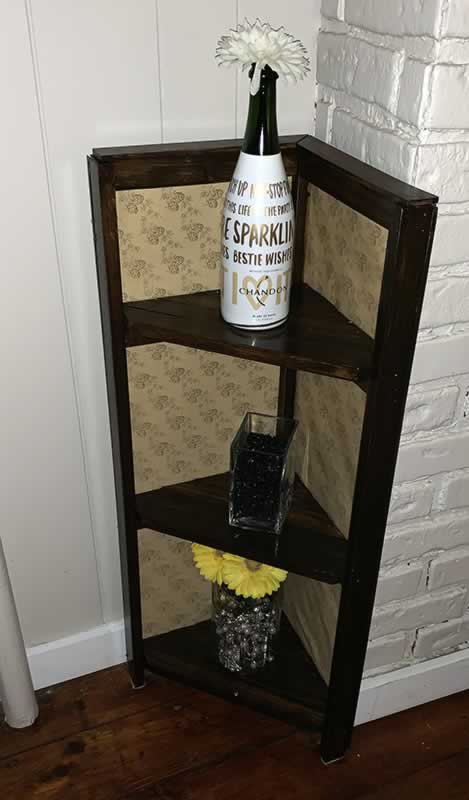