or Call Us at 1-800-776-2228
or Call Us at 1-800-776-2228
Deck lattice often sits at ground level and can face abuse such as runaway lawn mowers, kids playing or other day-to-day activities. Learn how to replace a broken lattice by using the Arrow T50R.E.D. Professional Staple Gun and Nailer, which features a high/low power switch. The high-power option offers the perfect amount of power to penetrate both the lattice and deck framework. Don’t forget to grab a pair of safety goggles and gloves (optional). State, local and municipal codes vary for home improvements depending upon your location, so please check before proceeding with your home repair.

Professional Staple Gun and Nailer
Lattice refers to the way the fence is patterned, not the material used, so several types of lattice are available for skirting projects. Cedar, birch and redwood are usually the top choices for unfinished wood lattice. However, vinyl lattice has many benefits over wood lattice. Vinyl lattice can be made in any color, and it’s durable enough to withstand all kinds of weather conditions. Since our previous deck skirting was damaged and the finish faded, we chose to replace the broken wood lattice with vinyl lattice.
Lattice refers to the way the fence is patterned, not the material used, so several types of lattice are available for skirting projects. Cedar, birch and redwood are usually the top choices for unfinished wood lattice. However, vinyl lattice has many benefits over wood lattice. Vinyl lattice can be made in any color, and it’s durable enough to withstand all kinds of weather conditions. Since our previous deck skirting was damaged and the finish faded, we chose to replace the broken wood lattice with vinyl lattice.
Use the pry bar and hammer to remove the broken lattice from the deck. Discard the broken sections.
Use the pry bar and hammer to remove the broken lattice from the deck. Discard the broken sections.
Use a rag to clean any debris off the framework surface. Make certain the framework is dry to the touch. If it is not dry, you will need to allow a few hours of drying time before proceeding to the next step.
Use a rag to clean any debris off the framework surface. Make certain the framework is dry to the touch. If it is not dry, you will need to allow a few hours of drying time before proceeding to the next step.
Stain the framework to match the existing deck. Allow the stain to dry before proceeding, following the manufacturer’s recommendation for drying time. We allowed three hours of drying time before moving to the next step.
Stain the framework to match the existing deck. Allow the stain to dry before proceeding, following the manufacturer’s recommendation for drying time. We allowed three hours of drying time before moving to the next step.
Measure the areas that require replacement lattice. Our deck required several measurements to place lattice around the existing framework and posts. Since vinyl lattice is thinner than wood and our posts were bolted to the framework, we decided to loosen the bolts and slide the lattice between the post and the frame for a cleaner look. To do this, we added an extra 1/8” on all sides of the lattice to be inserted behind the post.
Measure the areas that require replacement lattice. Our deck required several measurements to place lattice around the existing framework and posts. Since vinyl lattice is thinner than wood and our posts were bolted to the framework, we decided to loosen the bolts and slide the lattice between the post and the frame for a cleaner look. To do this, we added an extra 1/8” on all sides of the lattice to be inserted behind the post.
Place the lattice on the sawhorses. Mark the measurements on the new lattice sheet with a chalk line, which makes a perfectly straight line over a long distance. Hook the end of the chalk line to the end of the lattice and stretch the string tightly to cross directly over your mark. Keep enough tension to prevent the chalk line from touching the surface and leaving unwanted chalk marks. When you reach the opposite mark, turn the chalk line crank handle and stretch the string very tight, like a bowstring. Lower it to the mark and snap the line. Arrow Tip: Use one or two scrap 2×4 wood boards to stabilize the sheet of lattice on the sawhorses.
Place the lattice on the sawhorses. Mark the measurements on the new lattice sheet with a chalk line, which makes a perfectly straight line over a long distance. Hook the end of the chalk line to the end of the lattice and stretch the string tightly to cross directly over your mark. Keep enough tension to prevent the chalk line from touching the surface and leaving unwanted chalk marks. When you reach the opposite mark, turn the chalk line crank handle and stretch the string very tight, like a bowstring. Lower it to the mark and snap the line. Arrow Tip: Use one or two scrap 2×4 wood boards to stabilize the sheet of lattice on the sawhorses.
Position the circular saw blade at one end of the lattice sheet, lining up the blade with the marked chalk line. Cut along the full length of the marked line. Cut all of the marked areas.
Position the circular saw blade at one end of the lattice sheet, lining up the blade with the marked chalk line. Cut along the full length of the marked line. Cut all of the marked areas.
Use the file to clean up any rough edges created by the saw. Another benefit of vinyl lattice is that the finish is throughout, not just on the surface. It can be filed without loss of finish.
Use the file to clean up any rough edges created by the saw. Another benefit of vinyl lattice is that the finish is throughout, not just on the surface. It can be filed without loss of finish.
Use a shovel to even out the soil in the area around where the lattice will touch the ground. Arrow Tip: Use a scrap of the lattice and “saw” the ground where the lattice will touch to create a groove for the final lattice installation.
Use a shovel to even out the soil in the area around where the lattice will touch the ground. Arrow Tip: Use a scrap of the lattice and “saw” the ground where the lattice will touch to create a groove for the final lattice installation.
Secure the lattice to the deck framework using the Arrow T50R.E.D. Professional Staple Gun and Nailer and the Arrow 3/4” Brown Head Brad Nails. Because vinyl lattice has a uniform thickness, the 3/4” brad nails provide enough penetration into the surface; wood lattice with overlapping wood sections typically require a longer brad nail. Set the power switch on the Arrow T50R.E.D. to the high-power setting, as indicated by the plus sign, so the brad nail can easily penetrate both the lattice and the framework. Put a brad nail everywhere the lattice sections intersect or cross.
Secure the lattice to the deck framework using the Arrow T50R.E.D. Professional Staple Gun and Nailer and the Arrow 3/4” Brown Head Brad Nails. Because vinyl lattice has a uniform thickness, the 3/4” brad nails provide enough penetration into the surface; wood lattice with overlapping wood sections typically require a longer brad nail. Set the power switch on the Arrow T50R.E.D. to the high-power setting, as indicated by the plus sign, so the brad nail can easily penetrate both the lattice and the framework. Put a brad nail everywhere the lattice sections intersect or cross.
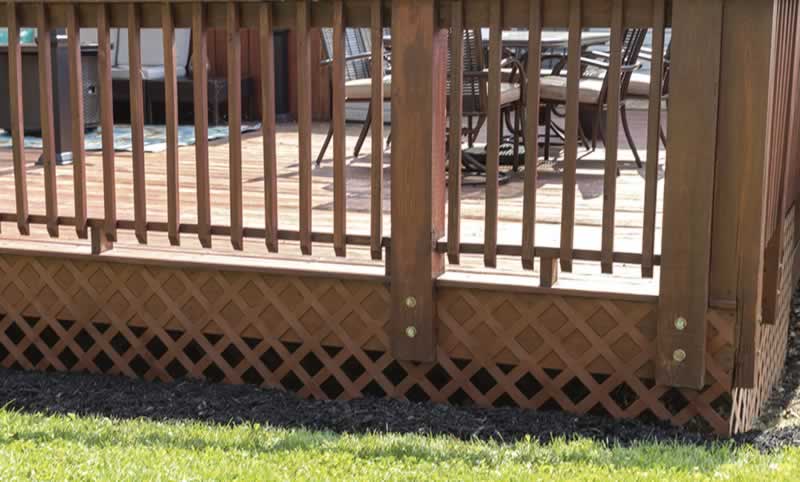
Continue securing the lattice to the deck framework until the underside of the deck is completely enclosed.
Continue securing the lattice to the deck framework until the underside of the deck is completely enclosed.
Spread mulch around the deck to cover the soil and improve the overall appearance of your property.
Spread mulch around the deck to cover the soil and improve the overall appearance of your property.
Relax on your deck and enjoy the look of your repaired deck lattice!
Relax on your deck and enjoy the look of your repaired deck lattice!
We’d love to see how your broken deck lattice project turned out! Share your project pictures on Facebook, Instagram or X by using #MadeWithArrow or tagging Arrow Fastener.
Get Arrow tips, tricks, projects and promos in your inbox!
Hey there! We’ve updated our Privacy and Cookie Policies at the request of some of our friends in Europe. Click Accept to let us know you’re okay with the updates. Thanks!
View Cookie Policy Accept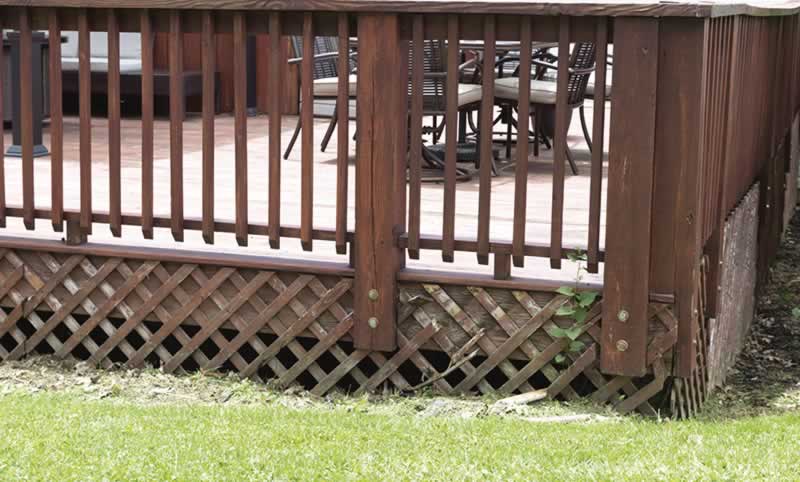