or Call Us at 1-800-776-2228
or Call Us at 1-800-776-2228
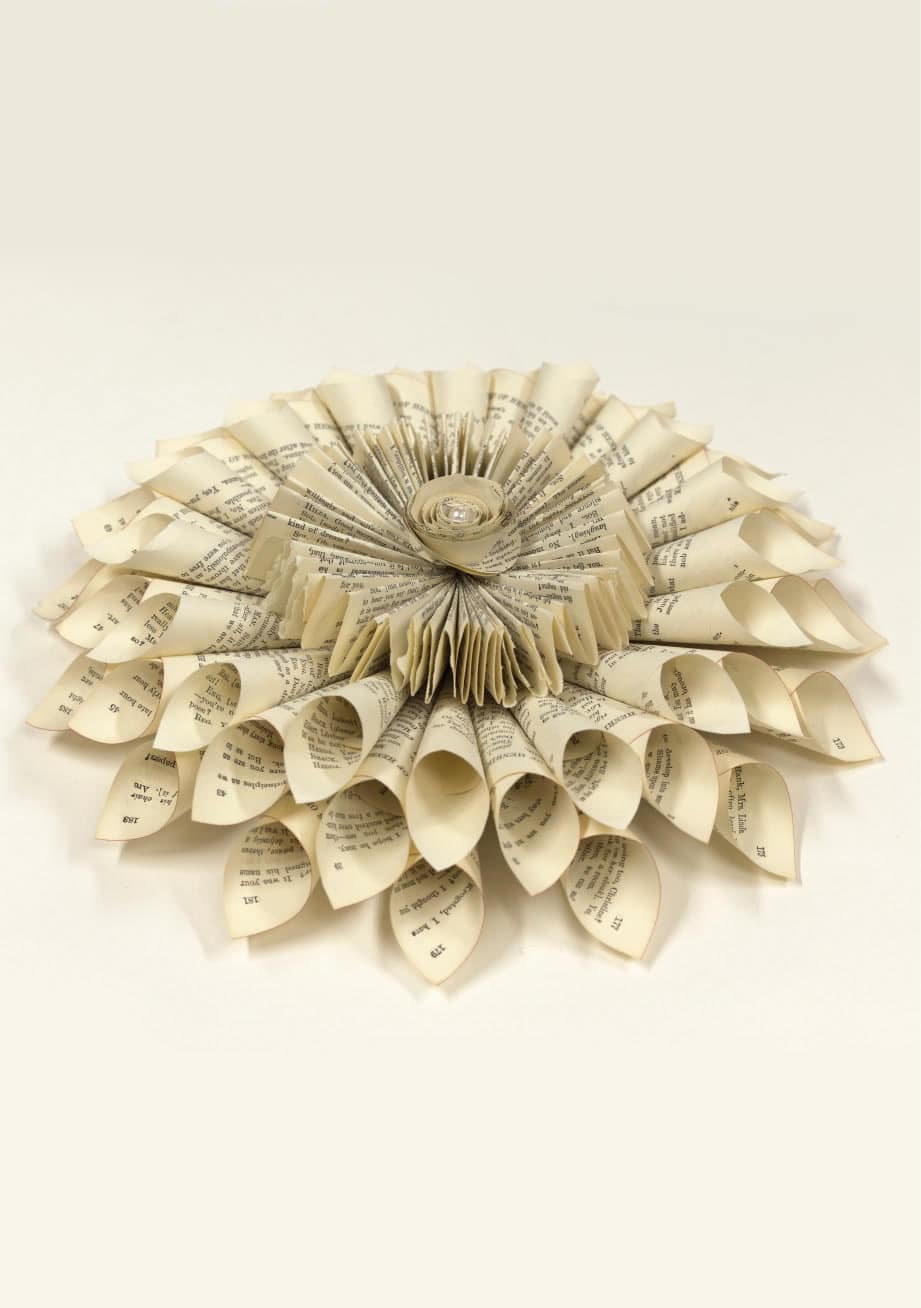
Are you a book lover? This DIY Book Page Wreath is a great accent to any room, and you can repurpose a discarded book.
For this craft, we chose the handy Arrow TR400WS Glue Gun Kit, which allowed for easy access to glue sticks and glue gun from the handy kit workstation for this glue-intensive project.
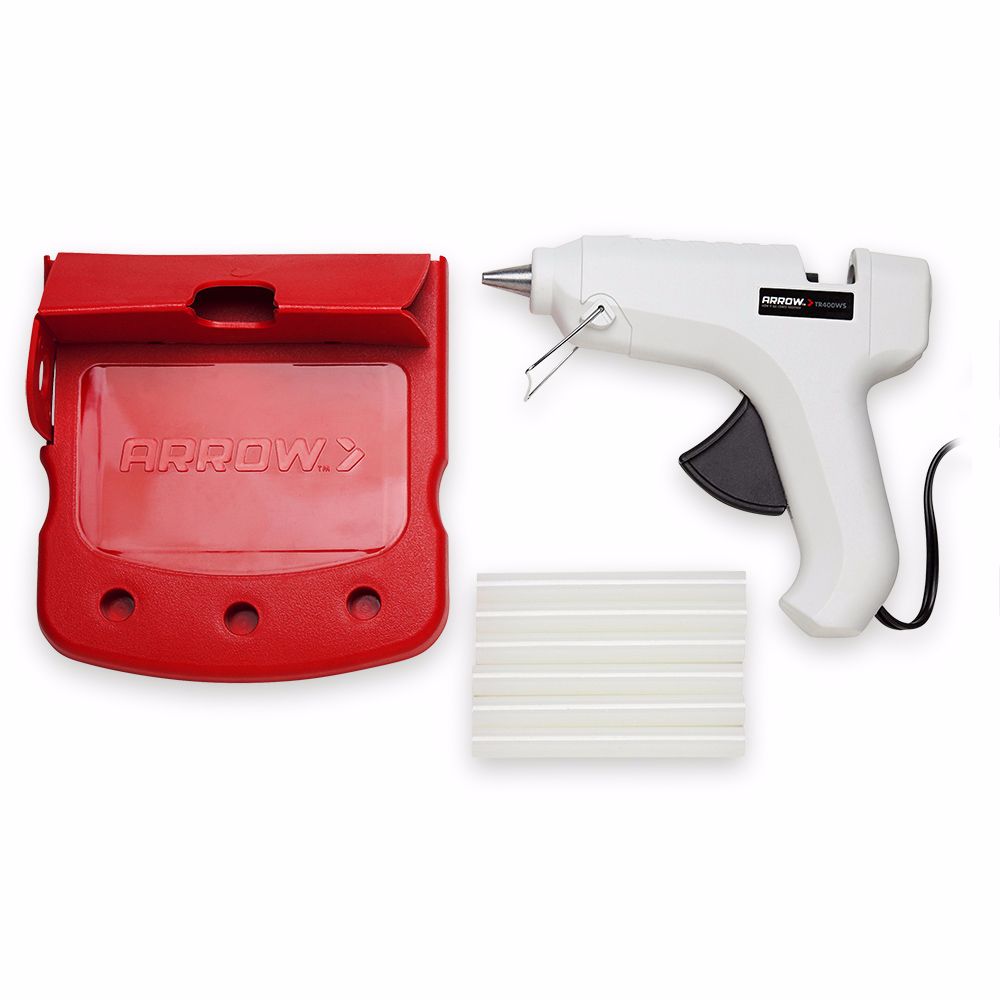
Glue Gun Kit
Carefully tear 58 pages from the book of your choice and cut into sizes specified: 32 – 4” squares; 16 – 3½” squares; 2 – 5” squares; and 8 – full pages (approximately 5” by 7”)
Carefully tear 58 pages from the book of your choice and cut into sizes specified: 32 – 4” squares; 16 – 3½” squares; 2 – 5” squares; and 8 – full pages (approximately 5” by 7”)
Roll all the 4” and 3½” squares into cones. First, place one square on a flat surface. The side facing you will become the inside of the cone. With your left hand, place your thumb and forefinger on the top and bottom corners. With your right hand, pick up the lower right corner and roll toward the upper left corner of square. Continue to hold the lower left corner as you roll the square into a cone. Once in cone shape, glue into place along the seam in the back. Roll all 48 squares and set aside.
Roll all the 4” and 3½” squares into cones. First, place one square on a flat surface. The side facing you will become the inside of the cone. With your left hand, place your thumb and forefinger on the top and bottom corners. With your right hand, pick up the lower right corner and roll toward the upper left corner of square. Continue to hold the lower left corner as you roll the square into a cone. Once in cone shape, glue into place along the seam in the back. Roll all 48 squares and set aside.
Draw 8 guidelines on the 5” square piece of board. Draw a line from corner to corner and from side to side. The next four lines are centered at equal distances from the first four lines. Next draw the 5/8” and the 1” circle guidelines directly in the center of the board.
Draw 8 guidelines on the 5” square piece of board. Draw a line from corner to corner and from side to side. The next four lines are centered at equal distances from the first four lines. Next draw the 5/8” and the 1” circle guidelines directly in the center of the board.
Using the awl, make two holes in the board according to the placement shown in the photo. Then thread the craft wire through the holes from the back. With the back of the board facing up, bend the wire into a loop. Flip the board over, and bend the ends of the wire back and thread through the holes again. Fold the wire again so the ends are in the back. Poke the ends of the wire into the board.
Using the awl, make two holes in the board according to the placement shown in the photo. Then thread the craft wire through the holes from the back. With the back of the board facing up, bend the wire into a loop. Flip the board over, and bend the ends of the wire back and thread through the holes again. Fold the wire again so the ends are in the back. Poke the ends of the wire into the board.
Take 16 of the cones made with the 4” squares and glue to board. Begin by placing a cone on every other guideline. We usually begin on a diagonal line. The bottom tip of the cone should meet the 1” circle guideline. Continue to glue cones to board until all 16 are secure. To ensure a professional appearance, keep the spacing between the cones as equal as possible.
Take 16 of the cones made with the 4” squares and glue to board. Begin by placing a cone on every other guideline. We usually begin on a diagonal line. The bottom tip of the cone should meet the 1” circle guideline. Continue to glue cones to board until all 16 are secure. To ensure a professional appearance, keep the spacing between the cones as equal as possible.
Take the remaining 16 of the cones made with the 4” squares and glue them to the board the same way you did in Step 5. But this time, the bottom tip should meet the 5/8” circle guideline.
Take the remaining 16 of the cones made with the 4” squares and glue them to the board the same way you did in Step 5. But this time, the bottom tip should meet the 5/8” circle guideline.
Use the awl to make a hole in the center of the board. Place the 1/8” diameter rod in the hole. This will act as a guide for this step and the following step. Now, take the remaining 16 cones – the smaller ones – and glue to board. The bottom tip of the cone should touch the inner circle.
Use the awl to make a hole in the center of the board. Place the 1/8” diameter rod in the hole. This will act as a guide for this step and the following step. Now, take the remaining 16 cones – the smaller ones – and glue to board. The bottom tip of the cone should touch the inner circle.
To make the center ruffle, take the 8 full pages and place vertically on a flat surface. Fold without creasing, accordion-style, in 1” strips. Then, fold in half and glue in center. Repeat for remaining 7 pages. Once folded, take 4 of the ruffles and glue to center of wreath in a plus-sign pattern. The top of the back corner should meet the rod. Glue the remaining 4 ruffles to the wreath in the same manner as the first 4 into the spaces visible. Remove rod.
To make the center ruffle, take the 8 full pages and place vertically on a flat surface. Fold without creasing, accordion-style, in 1” strips. Then, fold in half and glue in center. Repeat for remaining 7 pages. Once folded, take 4 of the ruffles and glue to center of wreath in a plus-sign pattern. The top of the back corner should meet the rod. Glue the remaining 4 ruffles to the wreath in the same manner as the first 4 into the spaces visible. Remove rod.
To make the center rose, take the two 5” squares and cut them into circles. Hold the two circles together and cut a spiral all the way to the center. With the tweezers, roll the spiral beginning with the tail. Roll all the way to the center of the spiral. Remove tweezers and hold in place. Set on flat surface; carefully allow it to slowly unravel a little bit. Glue at base to maintain a rose shape. Glue the pearl to the center of the rose. Glue the rose to the center of the wreath.
To make the center rose, take the two 5” squares and cut them into circles. Hold the two circles together and cut a spiral all the way to the center. With the tweezers, roll the spiral beginning with the tail. Roll all the way to the center of the spiral. Remove tweezers and hold in place. Set on flat surface; carefully allow it to slowly unravel a little bit. Glue at base to maintain a rose shape. Glue the pearl to the center of the rose. Glue the rose to the center of the wreath.
Display and enjoy!
Display and enjoy!
We’d love to see how your Book Page Wreath turned out! Share your results with us on Facebook, Instagram or X by tagging #MadeWithArrow.
Get Arrow tips, tricks, projects and promos in your inbox!
Hey there! We’ve updated our Privacy and Cookie Policies at the request of some of our friends in Europe. Click Accept to let us know you’re okay with the updates. Thanks!
View Cookie Policy Accept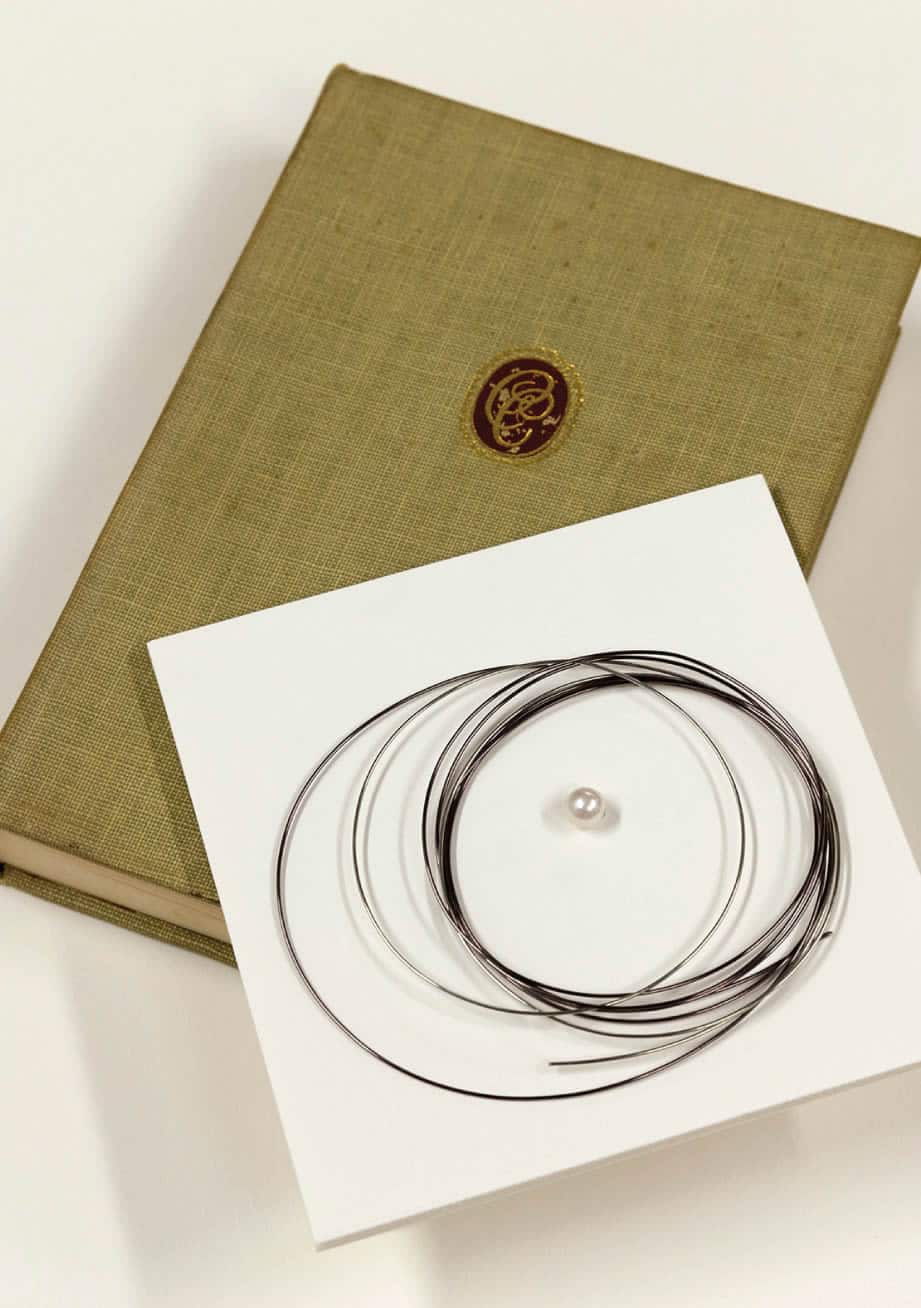