or Call Us at 1-800-776-2228


or Call Us at 1-800-776-2228


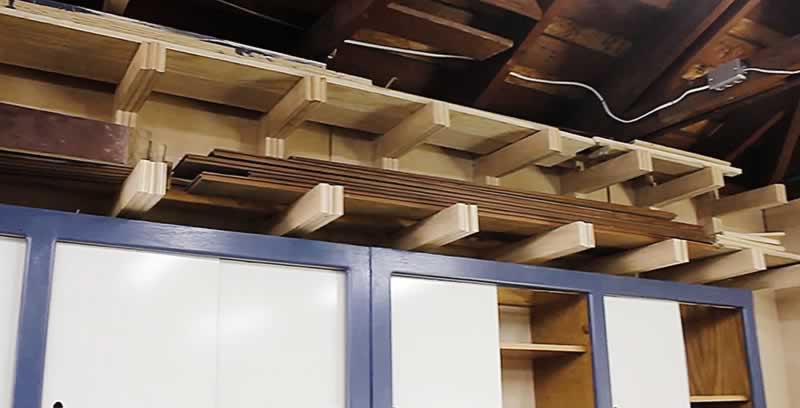
Like any shop space without proper storage, I was running into some big issues with clutter. After recently installing a few shelves for more proper storage, I decided that installing a simple DIY lumber rack above those shelves was the first step in further organizing my space. Here's how I did it.
Recognize that you have a big clutter problem in your shop, pick your location for a lumber rack and get to work.
Recognize that you have a big clutter problem in your shop, pick your location for a lumber rack and get to work.
Rip down your sheet of plywood on the table saw into 15 strips at 3” each. You can also use a circular saw for this step.
Rip down your sheet of plywood on the table saw into 15 strips at 3” each. You can also use a circular saw for this step.
Measure out and cut your pieces on the miter saw. I designed my setup to be 19” tall since I had a 20” space above my cabinets. I made nine of these individual racks from the material I had on hand.
Measure out and cut your pieces on the miter saw. I designed my setup to be 19” tall since I had a 20” space above my cabinets. I made nine of these individual racks from the material I had on hand.
Lay out all of your pieces to make sure you have everything you need. See the diagram for what pieces I cut for my lumber rack. The design of this build uses three layers of plywood to make a mortise/tenon joint and secure the rack to the wall mounted piece. Your cuts will be specific to your space, but I wanted to show you my cut list so you get a sense of how the tenons worked.
Lay out all of your pieces to make sure you have everything you need. See the diagram for what pieces I cut for my lumber rack. The design of this build uses three layers of plywood to make a mortise/tenon joint and secure the rack to the wall mounted piece. Your cuts will be specific to your space, but I wanted to show you my cut list so you get a sense of how the tenons worked.
Everything is assembled using glue and brad nails. Glue will hold things together long term, and the brad nails tack things in place while you assemble. Spread glue evenly on each surface and tack things in place with your brad nailer. I recommend using the large tenon piece as I do above to space out the center pieces of the wall mounted support.
Everything is assembled using glue and brad nails. Glue will hold things together long term, and the brad nails tack things in place while you assemble. Spread glue evenly on each surface and tack things in place with your brad nailer. I recommend using the large tenon piece as I do above to space out the center pieces of the wall mounted support.
The first photo shows one completed piece. The tenons will slide into the mortises you’ve created and will make your overall rack. Then, repeat that process for as many racks as you need (I made nine).
The first photo shows one completed piece. The tenons will slide into the mortises you’ve created and will make your overall rack. Then, repeat that process for as many racks as you need (I made nine).
To secure the tenons, I used six total 2” screws, three for each tenon. I drilled in two on one side, and a single screw on the opposite side. They were very secure.
To secure the tenons, I used six total 2” screws, three for each tenon. I drilled in two on one side, and a single screw on the opposite side. They were very secure.
I had 3” screws, so I drilled out some 5/8” holes using a Forstner bit, allowing my screws to go through the anchor bases and into my studs. If you have longer screws or thinner anchor bases, you can skip this step. I then pre-drilled in my screws using my impact driver so that I didn’t need to drill in screws while standing up on a ladder.
I had 3” screws, so I drilled out some 5/8” holes using a Forstner bit, allowing my screws to go through the anchor bases and into my studs. If you have longer screws or thinner anchor bases, you can skip this step. I then pre-drilled in my screws using my impact driver so that I didn’t need to drill in screws while standing up on a ladder.
Get up on your ladder and attach all of your racks to your studs. I started on the left side, anchored both screws to the studs, and then made my way to the right. Repeat the process, checking for square against the wall and level to the previous rack with each step.
Get up on your ladder and attach all of your racks to your studs. I started on the left side, anchored both screws to the studs, and then made my way to the right. Repeat the process, checking for square against the wall and level to the previous rack with each step.
After finishing, I loaded up my DIY lumber rack, getting all my materials off the floor. Then it was time to enjoy my newly organized shop.

Get Arrow tips, tricks, projects and promos in your inbox!
Hey there! We’ve updated our Privacy and Cookie Policies at the request of some of our friends in Europe. Click Accept to let us know you’re okay with the updates. Thanks!
View Cookie Policy Accept